Illustration courtesy Singlecoil
Let’s have a deep look into what can be done to get rid of single-coil hum, which can be very annoying, especially when playing live. I’m sure you all know the situation: Your band managed to get an important Friday night gig at, let’s say, Bob’s Country Bunker. You and your bandmates arrive in time to set up your equipment, naturally with everything plugged into the same circuit as Bob’s popcorn machine, dishwasher, and sandwich maker. You plug in your Strat, turn up your amp, and there’s a loud humming noise coming out of it.
A single-coil pickup has one coil with six magnet rods and two bobbins holding everything together. It not only picks up the strings, but also all kinds of external magnetic fields generated by transformers and other electromagnetic devices. But when two coils are wound in opposite directions and are working together, the hum will get canceled. This is an old principle dating back to the beginning of the 20th century, and it’s how a humbucker pickup works. In the past, guitarists had to struggle with radio stations, fluorescent tubes, transformers, and the like; today, it’s more digital fallout and, of course, digital power supplies of all kinds.
The pickup industry created all kinds of hum-canceling pickups in single-coil shape, most commonly stacked and double-rail-style pickups. So, a humbucker pickup can be the ticket out of such unpleasant live situations. But all of these options generate a different magnetic field compared to a single-coil pickup, resulting in a different tone. The resonant frequency is shifted downwards a little bit because the ohmic resistance and inductance of the two coils are added together. The tone gets milder and warmer, with more midrange—you all know this tone. Splitting such a humbucker will sound more single-coil-like, but it will pick up hum again. Connecting both coils in parallel rather than in series will also sound more single-coil-like and is hum-canceling, but it’s not a real single-coil tone.
Using a reverse wound, reverse polarity (RWRP) pickup such as a Strat’s middle pickup will get you at least two hum-free switching positions (bridge+middle and neck+middle), but even this sounds different. Going active is another way to fight humming noises, and these special pickups sound more or less like a real single-coil, too.
But what if you don’t want to compromise? Is pure single-coil tone with no hum possible? Yes and no! It is possible to come close, but one day, a digital gremlin may find a way to annoy you to a certain degree. And there are extreme situations where only a humbucker will work.
One step in the right direction is shielding the pickups and cavity of your guitar. Shielding the compartment of a guitar the right way is a challenge on its own, and I will cover this in a future installment of this column. But even if all the shielding is done the right way, the sound of the pickup will be altered to a certain degree, which is the nature of the beast. And the shielding is always there, so you can’t switch between pure single-coil and shielded single-coil tone.
So, what about switchable hum-canceling for your guitar? This way you could have both: pure single-coil tone and hum-free operation when needed. And if this could not only be made switchable but also controllable, you could balance your tone between the two.
Here is a solution based on principles from Bill Lawrence, which my dear friend Bernd C. Meiser from the BSM company has refined in order to make it more controllable: a variable dummy coil.
“But what if you don’t want to compromise? Is pure single-coil tone with no hum possible? Yes and no!”
In simple terms, a dummy coil is an additional pickup that is identical to the other pickups but without magnets. It has a phase, but no polarity. A dummy coil accepts the electric signal created by the magnetic single-coil pickup and reverses it, which will remove a large portion of the hum. In the process, a very small amount of the treble signal is lost as well. However, this treble loss is far less compared to stacked or dual-rail humbuckers.
The specs of the dummy coil need to be close to the pickup you are complementing. So, any universal dummy coils advertised to work with all single-coil pickups will only work to a certain degree but not perfectly. Instead, it’s best if you order a dummy coil that matches your pickup. The company who made your pickup will know the formula, and a dummy coil from them will be super effective. If that pickup is from a larger manufacturer, you’ll need to find out specific parameters—wire gauge, wire type, number of turns—so a custom pickup company can make a matching dummy coil for you.
The simplest way to set up a dummy coil would be to connect it permanently, so it’s 100 percent active all the time. For more flexibility, you can add a switch to turn the dummy coil on and off. But the most flexible way is to use a pot to control the dummy coil, so you can dial in pure single-coil tone, 100 percent dummy-coil hum-removing, and everything in between—in other words, so you can balance tone and hum-free-ness depending on the certain playing situation.
To do so, connect a 0.01 uF capacitor in parallel to the dummy coil. The high-end frequencies will no longer pass the dummy coil and its inductance; they will be drained low-resistance to ground. For the bass frequencies, the capacitor is still high-resistance so the dummy coil is active. This way you will have humbucking functionality for the bass frequencies, but pure single-coil tone in the high frequencies—what a perfect and clever solution from Bill Lawrence. If you now connect the capacitor and the dummy coil to a pot, you have a controllable dummy coil as described above.
You can experiment with the capacitor value for fine-tuning your system; 0.01 μF is a pretty good value to start. With a smaller cap, you shift the humbucking effect toward the high frequencies and vice versa. A smaller cap means more overall humbucking (bass and highs) and a larger cap means less overall humbucking, with the high and middle frequencies staying untouched.
A Stratocaster is perfect for this mod because it has two tone controls. One will be converted to a Telecaster-style master tone control, while the other will become the new dummy-coil controller.
For a Stratocaster with three vintage flavored single-coil pickups, I recommend the following pot configuration (all audio taper): 250k volume, 500k tone, 500k dummy-coil controller. This way, in humbucking mode, the two coils are connected in series rather than in parallel, so the resonance peak will be dampened. The two 500k pots will help compensate for this. The 250k volume is always the way to go in a passive guitar system to ensure the best and most even control. The 500k tone pot can be a little bit over the top in pure single-coil mode, but simply roll it down a little and you are in the 250k ballpark—problem solved!
Here we go for the wiring. It’s not hard to do and mostly uses the parts that are already there:
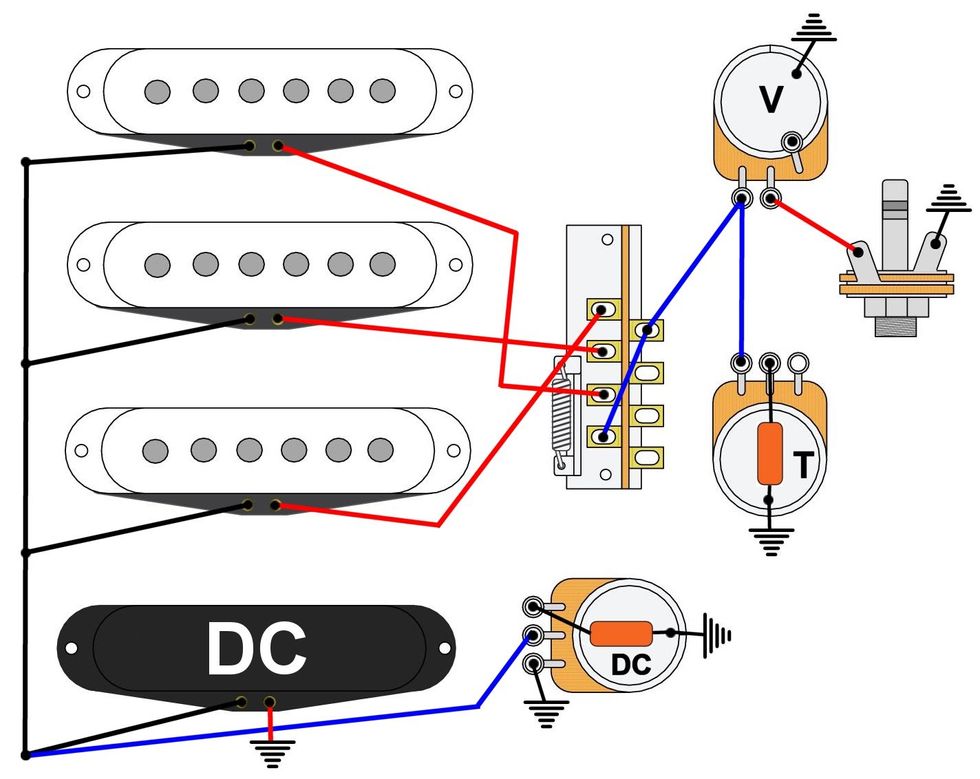
Illustration courtesy Singlecoil
That’s it! Next month, we will talk about some alternative ways to service a Stratocaster that can be real time savers, so stay tuned.
Until then ... keep on modding!

Bryan’s abstract representation of low-end compression.
Keeping a Low Profile
Is it just me? It seems like every time I listen to new music (especially indie, alt-rock, hip-hop, and pop), one thing I can always expect is a massive and unwelcome deviation of the low end from artist to artist—even within the same genre! Some songs have a wonderfully inspired low end that invites the listener to turn it up and get inside the mix, while others are so far off the low-end chart that I need to get out my Richter scale to measure single-digit bass frequencies while driving to AutoZone to replace every nut, bolt, and washer that rattled off my car during the song. Those mixes feel less like a song and more like an assault by a renegade 808-tuned sub-bass. Personally, I think low-end information should be long enough to cover the subject, but short enough to keep it interesting.
With that in mind, let me offer some ways that you can tighten up your bottom end and glue your mix together so everything is in balance instead of a “lead kick drum” mix. The Dojo is now open.
So Happy Together
Because the kick drum and bass guitar are such critical components of the rhythm section, compressing the kick drum and bass guitar together on a dedicated bus is a common and effective technique in audio production that substantially contributes to a tighter and more cohesive low-end foundation in a mix. You’ll know from reading my past articles that nothing triggers compression like low frequencies, so it makes perfect sense to explore and route low-end elements into one compressor and spare the other instruments in your song from having their dynamic range suffer because the compressor is reacting to the bass frequencies. When applied to both the kick drum and bass guitar, compression helps to even out the fluctuations in volume, ensuring a more consistent and controlled low end. This is particularly beneficial in genres like rock, pop, hip-hop, R&B, and electronic music, where a steady and powerful low end is often desired.
Picking a Foundation
What is important for you to decide is which one of the two will be on the bottom and serve as a foundation for the other. That ranges by genre, and you should be aware of how you want to approach that relationship. For example, is the fundamental frequency of the kick drum lower than the lowest bass note played in the song, or vice versa? Adjust accordingly. Remember that the kick drum and bass guitar often share similar frequency ranges, and their frequencies will likely clash or compete for space in the mix until you make this decision. If the kick drum “role” in your song is fixed (like an acoustic kick drum) and has a stable fundamental low-end frequency, carve a little bit of that same frequency out of your bass instruments to reduce “masking”—and they’ll both have more clarity.
Mutually Beneficial
One benefit of using a shared compressor is that it’ll ensure that the low frequencies will remain controllable, and reduce any sudden jumps between different sections of a song, such as verses and choruses.
“I think low-end information should be long enough to cover the subject, but short enough to keep it interesting.”
Another plus is that compressing the kick and the bass instruments together can emphasize the transient characteristics of both. By adjusting the attack and release settings on the compressor, you can enhance the initial attack of the kick drum and the pluck or pick attack of the bass guitar. This results in a more pronounced and impactful low end, adding punch and definition. And by bringing these two elements together, you allow them to work in tandem rather than independently.
In genres like dance music and hip-hop, where a consistent and powerful low-end energy is crucial, compressing the kick and bass together will maintain a steady foundation throughout the track. In addition to this, remember that you can also side-chain the output of the kick drum to a key-inserted compressor on the bass track for some good old bass pumping.
Simplify the Process
Compressing the kick and bass guitar together will help you streamline your mixing process and reduce the need for individual processing of each element. Sure, you’ll still want some individual instrument processing and fine-tuning (EQ, etc.), but compressing them together later will give you a solid starting point for mixing the rest of the instruments in the song.
Until next time, namaste.

Brought to you by Focusrite.
Bryan’s MIDI-based ’board.
For guitarists, MIDI was a bit of a useless concept—something the synth player in your band endlessly yammered about while you plugged in your amp and pedalboard and set up for the gig. Well, tighten up your belts, the Dojo is now open.
The Paradigm Changes
Developed by a consortium of musical heavyweights, including MIDI’s progenitor Dave Smith (Sequential Circuits), Ikutaro Kakehashi (Roland Corporation), and engineer Tom Oberheim, MIDI enables synths and drum machines from various makers to “talk” to one another using a standardized “language” over a 5-pin cable. The original MIDI instruments included Roland’s TR909 and Jupiter-6, and Smith’s own Prophet 600. Today, MIDI can be carried over USB, 3.5 mm, and 1/4" TRS cables, as well as Bluetooth. It’s also something that more and more pedal makers are taking advantage of en masse. Many months ago with the help of my friends at XAct Tone Solutions here in Nashville, I finally wired up a MIDI-based pedalboard (Photo 1). Why would I ever go down this rabbit hole?
“Until very recently, guitar-oriented manufacturers never took advantage or expanded on MIDI possibilities.”
For several huge reasons: It gives me greater control over all of a given pedal’s obvious (and hidden) parameters that I can adjust simultaneously using expression pedal(s); the ability to toggle, latch, or tap tempo for many pedals at once; to create, save, and adjust wildly divergent preset parameters on the fly (using CC and PC messages); and organize song lists and set lists, for starters.
While this is possible with multi-effects pedals from Line 6, Fender, Neural DSP, Boss, Kemper, etc., I often find that I don’t like all the sounds bundled within these units. I may not like certain types of amp models, overdrives, choruses, reverbs, fuzz, and delay offerings from one maker, and prefer the algorithms of another brand entirely. With more and more pedal manufacturers embracing MIDI, we’re much closer to a “having our cake and eating it too” scenario.
I can further use my MIDI-enabled pedals with instruments beyond keyboards, drum machines, samplers, and other MIDI controllers (this may be the subject of a future Dojo). But for now, I want to get your creativity fully charged, and take you down another rabbit hole I stumbled into!
Becoming a Convert
Let me give you one of my new favorite “effects” I’ve been exploring. This involves using any plugin or software that will convert audio to MIDI. Certain DAWs (Ableton, Pro Tools, etc.) already have the ability to convert an audio file to MIDI. If your DAW does not, you can use Melodyne and pitch-based plugins, or free ones specifically made for this like NeuralNote or Basic Pitch, which were developed by Spotify.
Try This
Now let’s “break” the plugin. Either use a prerecorded audio track (guitars, vocals, bass, keys, or even ambient field recordings), or grab your guitar and record something with all the effects you would normally use. Delays are particularly fun to have here since they repeat pitches already played! Now convert this audio track to MIDI. In Pro Tools, right-click on the audio file and select “Copy Audio as MIDI.” I tried this using a fuzzed-out solo I played on a recent record I produced.
Next, create an instrument track and instantiate a soft synth of your choice (I’ve used Arturia’s Jup-8 with one of my tweaked presets). Now paste (Cmd or Ctrl+V) the MIDI-ized audio onto the instrument track. Based on your sensitivity settings, you should have all kinds of crazy extraneous notes in various octaves.
From here, solo the instrument track with your new MIDI, and let your imagination loose! Pay attention to the parts of your original audio track that were accurately “preserved” and what parts were not. You can now play with velocity, duration, quantization, and transposition for any and all notes. For example, I chose to isolate notes that were originally part of the delay and then adjusted them to match the underlying implied chords I soloed over—thus turning my guitar’s delay into a MIDI chord accompaniment for my solo!
I hope you canceled your dinner plans. Blessings, and until next time, Namaste.
