If you’ve been recording in your home studio, you know that having the right effects plugins can make your track-cutting, mixing, and production pop. But trying to keep up with what’s out there? Well, let’s just say option fatigue is real.
We’re lucky. As Nashville-based producer-engineers who are also instructors at Belmont University in the Audio Engineering Technology program, we see and—more importantly—hear and use a lot of effects plugins. And while this article is by no means definitive, we are about to present you with an array of choices from the five essential plugin food groups—modulation (chorus, phasing, tremolo, vibrato), time-based (delay and reverb), spectral (EQ and panning), dynamic (compression, limiters, etc.), and filter (low-pass, high-pass, band-pass)—that you might consider investigating to fortify your recording diet. All of these will be easy to work with as long as you’re comfortable with your DAW, and all are compatible with Mac and PC operating systems.
Modulation
You’ve been hearing these effects all your life, in many of your favorite recordings, but there’s nothing quite like getting your hands on the controls of a wealth of modulation options to spice up your sonic menu. We suggest checking out the following.
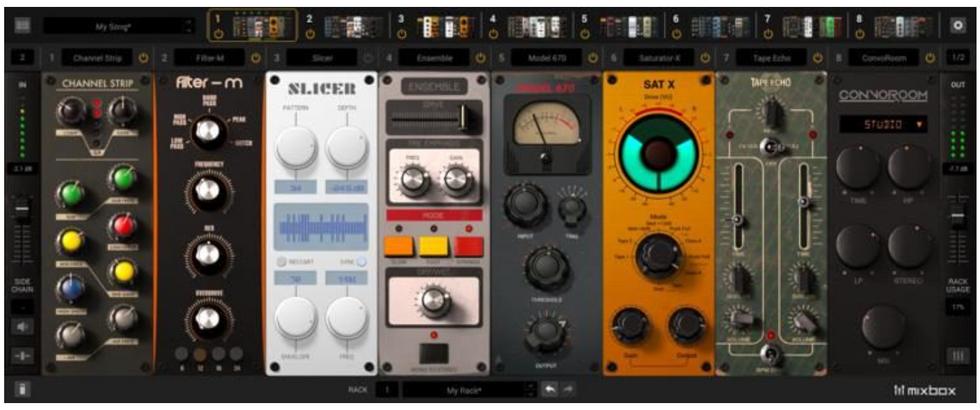
• IK Multimedia MixBox ($79–$199 street, as well as a free version): One of our favorite go-to plugins is MixBox from IK Multimedia. From both a production and mixing workflow, the creative and sonic possibilities of this 500-series-style plugin are endless! On the topic of modulation effects, in addition to the standards (chorus, phase, tremolo, and vibrato), MixBox offers a unique selection of processors that include AM/FM modulators, Auto Pan, and Slicer. As the name suggests, the Slicer module works great for adding rhythmic slices and random patterns to your audio tracks. I’ve found that using the combination of the Pattern and Freq parameters allows for endless control of rhythmic and tonal variation when used with synth leads, etc. Altogether, this package offers up to 70 effects and processors.
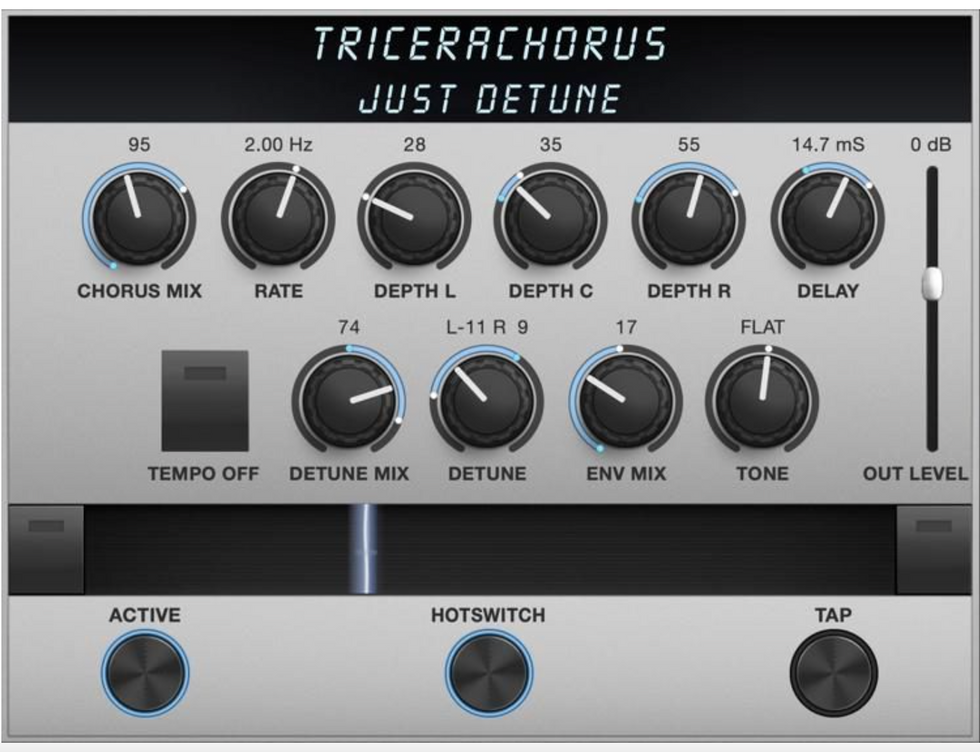
• Eventide TriceraChorus Vintage Tri-Chorus ($99 street): When you think of the chorus effect, songs such as “Every Breath You Take,” “Come As You Are,” and the classic guitar intro to “Run To You” by Bryan Adams will immediately come to mind. This versatile plugin takes on the famed Tri-Stereo chorus, used on sessions by Steve Lukather and Michael Landau, and offers a wide variety of presets and features that can be used on guitar, bass, vocal, keys, and synthesizers to achieve the signature watery/lush and chorale effect.
“You’ve been hearing these effects all your life, in many of your favorite recordings.”
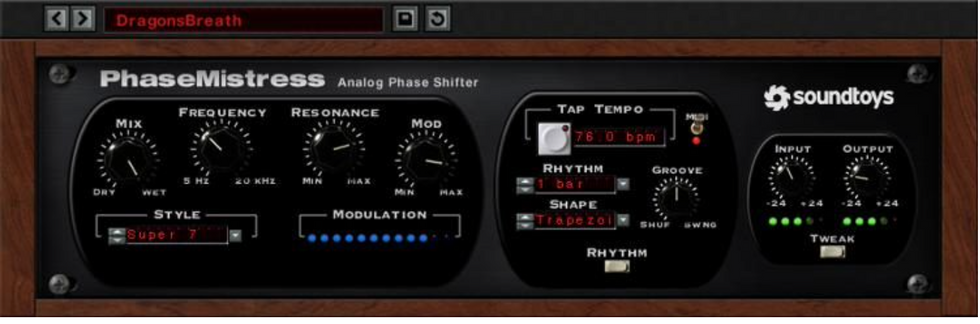
• Soundtoys PhaseMistress Analog Phase Shifter ($99 street): Phase shifting is an essential effect that has been used as a creative layer on numerous recordings over the decades, starting with Jimi Hendrix. And, of course, there’s the opening riff of Van Halen’s “Ain’t Talkin’ ’Bout Love.” The PhaseMistress, whose name alludes to the Maestro Phase Shifter and the EHX Electric Mistress, is a versatile processor that allows you to dial in a variety of sounds that are modeled after the same analog pedals that guitar giants such as Jimi, EVH, and David Gilmour used. With all DSP plugins these days, we’re seeing more additional processing and signal chains. An added feature that really sets the PhaseMistress apart is the analog-style algorithms (Clean, Fat, Squash, Dirt, Crunch, Shred, and Pump) that also add a touch of saturation and compression to the signal you are working with.
Time-Based
These delay and reverb effects can lead you to wide sonic vistas and otherworldly locales, as well as classic guitar tones—creating depth and dimension, and enhancing the spatial impression of a mix.
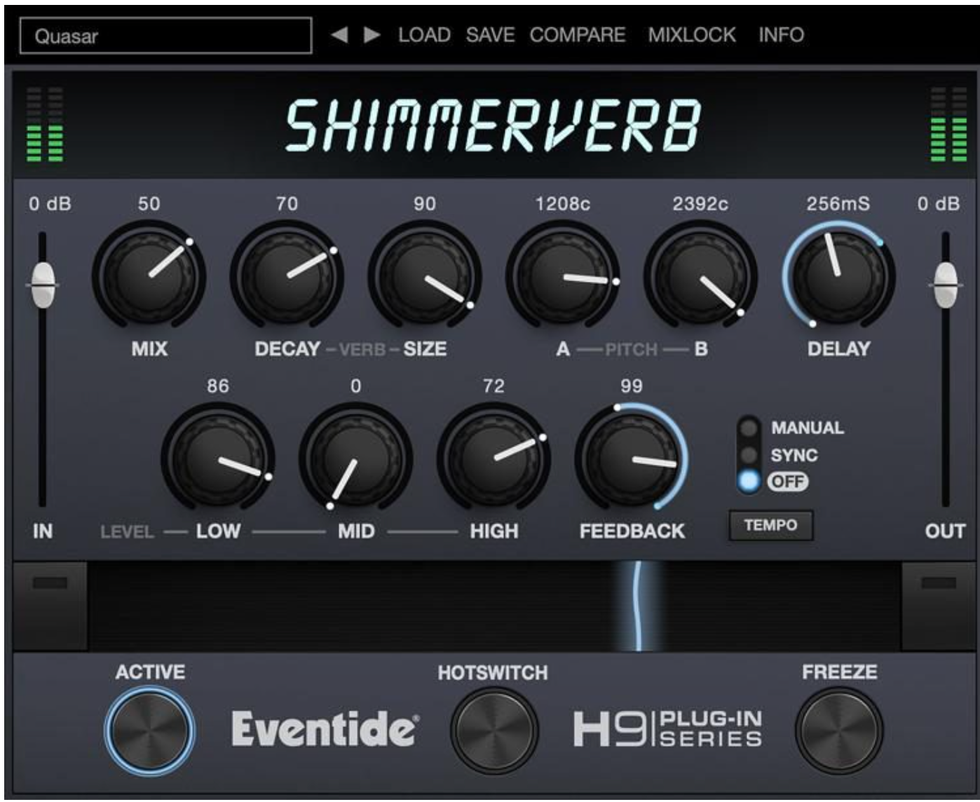
• Eventide ShimmerVerb ($99 street): We love experimenting with different types of time-based effects for creative effect and spatial cohesion. For creating ambient and ethereal spatial texture, one of our favorite digital reverbs is the ShimmerVerb, a reverb plugin with parallel pitch shifters. The presets alone sound great, and there’s a wide variety of dreamy tones that can work perfectly for both live and recording situations. One of our go-to recording setups is running a Fender Strat with a Lollar Imperial pickup in the bridge through a ’65 Deluxe emulation with a slight touch of tremolo and the ShimmerVerb’s Radiant Caverns setting. Sublime!
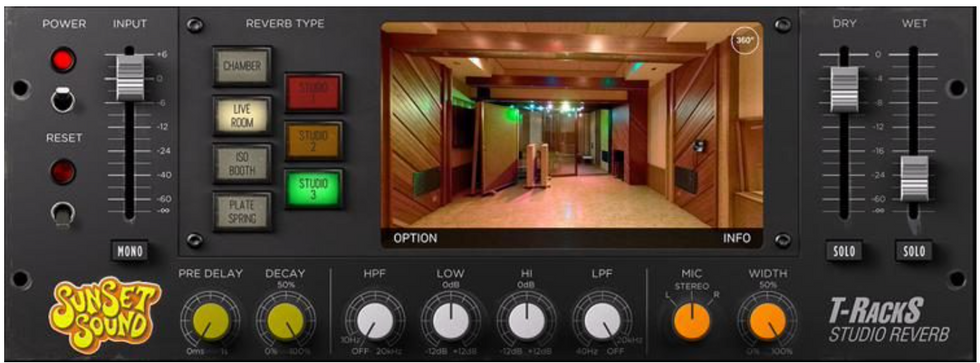
• IK Multimedia T-RackS Sunset Sound Studio Reverb ($149 street): To our thinking, the Sunset Sound Studio Reverb should be in every mixing engineer’s toolbox. Based on the hardware at the historic Sunset Sound Studio in Los Angeles, this processor works great across many instruments and musical genres. The plugin offers seven different reverb types that include Chamber, Live Room, ISO Booth, Plate/Spring, and Studios 1, 2, and 3. What sets this reverb plugin apart from others is the ability to control the stereo image of the reverb width.
“One of our go-to recording setups is running a Fender Strat with a Lollar Imperial pickup in the bridge through a ’65 Deluxe emulation with a slight touch of tremolo and the ShimmerVerb’s Radiant Caverns setting.”
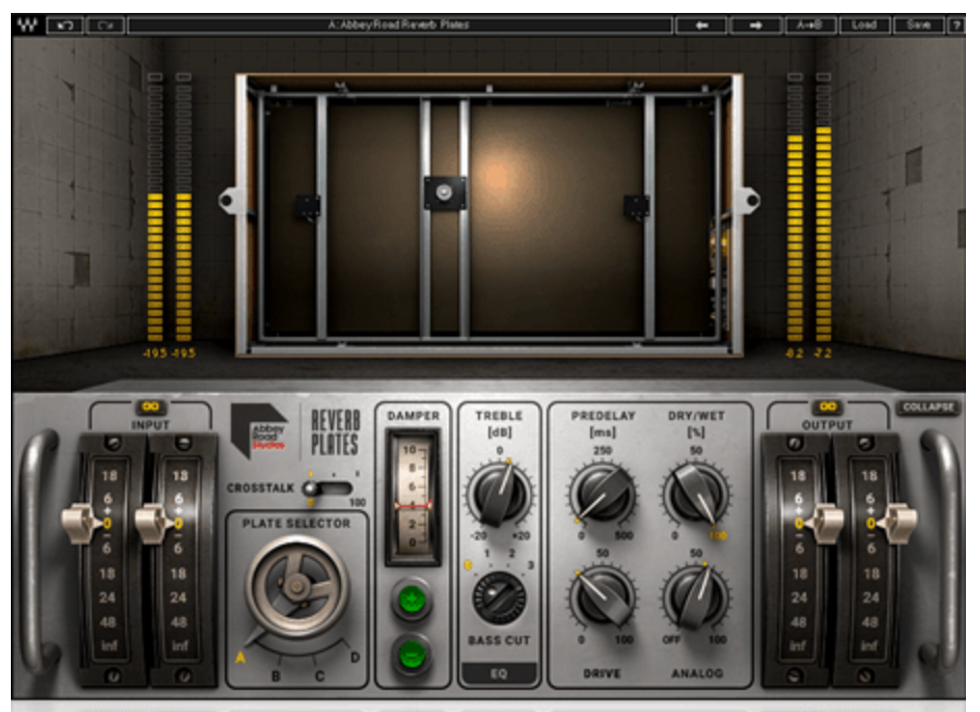
• Waves Abbey Road Reverb Plates ($35 street): Of course, whenever you hear the name Abbey Road, you think of the Beatles. This plugin lets you apply virtual versions of the legendary London studio’s reverb plates to your audio tracks—plates that breathed space into recordings by the Fab Four, Pink Floyd, and many others. The Waves Abbey Road gives you four different modeled plates to choose from. Of course, as with most time-based plugins, this processor has built-in equalization parameters, pre-delay, and a dry/wet blend. However, unique features of the Waves Abbey Road Plates are the Drive and Analog options.
Dynamic
And now we enter the world of compressors and limiters, which, when used correctly, can burnish guitar and bass tones with the precision of a sculptor.
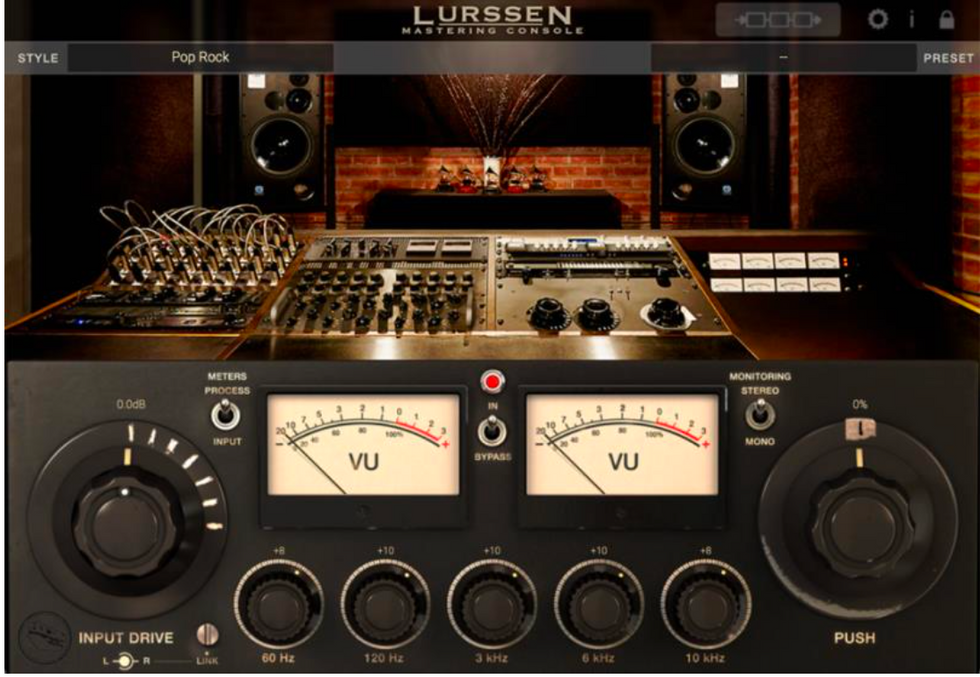
• IK Multimedia Lurssen Mastering Console ($149 street): One of our favorite processors to use on the master bus is this plugin suite, which offers compression, EQ, de-essing, and limiting. It has a wealth of features, like a push control for EQ adjustment and an input drive control, that make it easy and intuitive to use. We really like the 5-band EQ for adding subtle touches of low-end beef and high-end sparkle to tracks. We use the term “glue” frequently in the world of mixing. This plugin is the superglue that binds overall mixes together by adding a nice blend of overall dynamic and spectral enhancement. While final mastering is always best left to mastering engineers, the Lurssen Mastering Console makes pseudo-mastering your tracks more easily attainable.
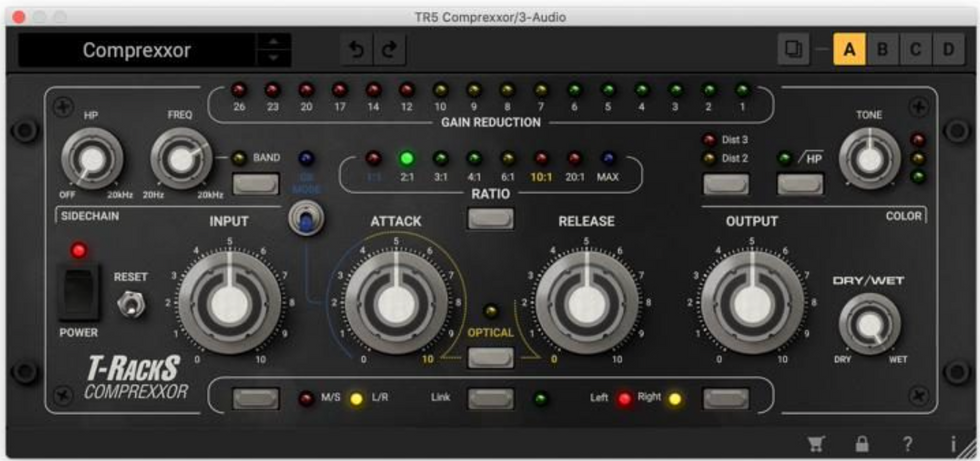
• IK Multimedia T-RackS Comprexxor ($149 street): As soon as we got our hands on the Comprexxor, we were blown away. This plugin is definitely like a Swiss Army Knife. This is one of our favorite dynamic processing plugins to use for heavier/cinematic rock music. The Drum Squash Room setting has proven to be excellent when routing drums for parallel compression. Among the Comprexxor’s exceptional features are second- and third-order harmonic saturation, optical and mid-side processing, and the Tone Color Control parameter.
“We know that there are different benefits and practical applications of the two main types of equalizers: parametric and graphic.”
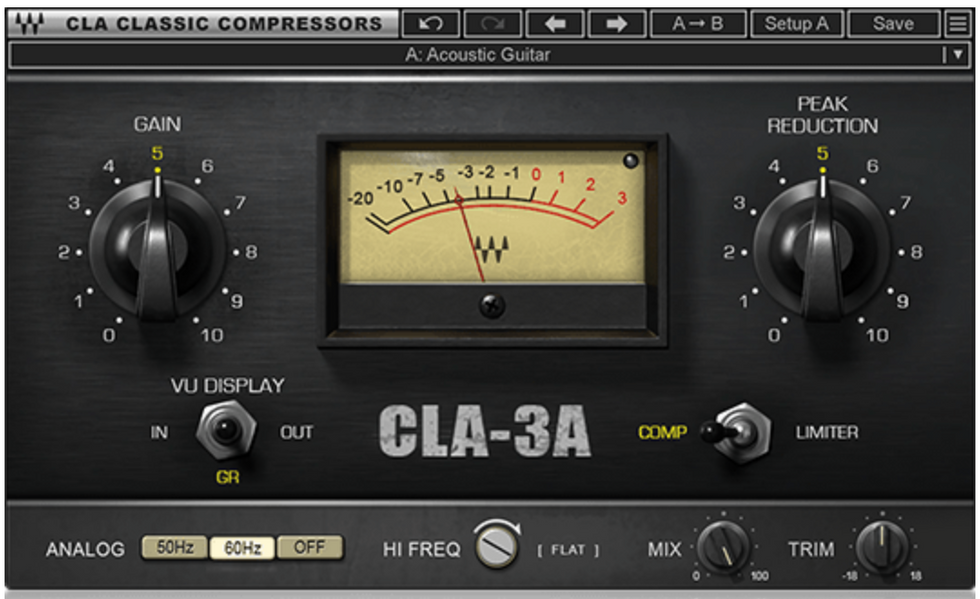
• Waves CLA-3A Compressor/Limiter ($49 street): The Waves CLA-3A is hands down one of the most effective and dynamic-enriching processors we have ever used. We recommend it for anybody who wants to experiment with mixing in a DAW. At times, it can be frustrating for up-and-coming engineers to grasp the concept of compression. When we use compression, we either want to add punch or beef to audio tracks—say, kick drums or bass guitars—or balance the dynamic range of certain vocals and instruments. Compressors also enhance and add tonal character to your audio signals. When you look at the CLA-3A plugin’s interface, you see two main parameters for controlling the compression amount and the makeup gain, labeled “gain” and “peak reduction.” Pretty straightforward, right? While I always trust my ears, it is also nice to have the CLA-3A’s VU metering display to see where the levels are hitting. For the low price, intuitive controls, and dynamic richness that this processor can add to your tracks, the CLA-3A is a must-have tool.
Spectral
EQ and panning open up an aspect of the listening experience that many home-studio engineers overlook, or at least underplay. For the early rulebook, consult Hendrix’s Axis: Bold as Love, but Radiohead and countless others have made their albums living, breathing organisms by using tools like these to change the sonic field and the range of their tracks.
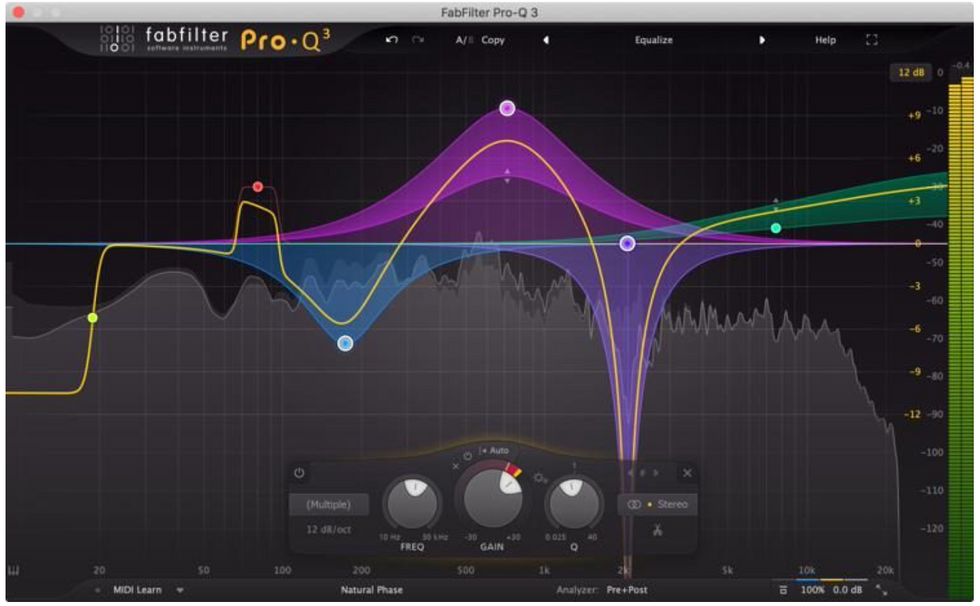
• FabFilter Pro-Q 3 EQ and Filter ($169 street): Equalization is like sculpting: It’s about carving out space in your mix to make room for all the musical elements. The FabFilter Pro-Q 3 offers a robust set of features that give you enhanced control over the spectral landscape of your audio. The fresh look of this plugin’s interface immediately calls your attention to the parametric curves and the spectrum analyzer for visualizing the overall spectral balance. Two features of the Pro-Q 3 that really stand out are the intelligent solo mode and MIDI Learn. Perhaps you have heard the phrase “search and destroy” when it comes to finding problem frequencies in a mix? Using the intelligent solo mode helps you to better locate such problem areas and remove them from your mix quicker.
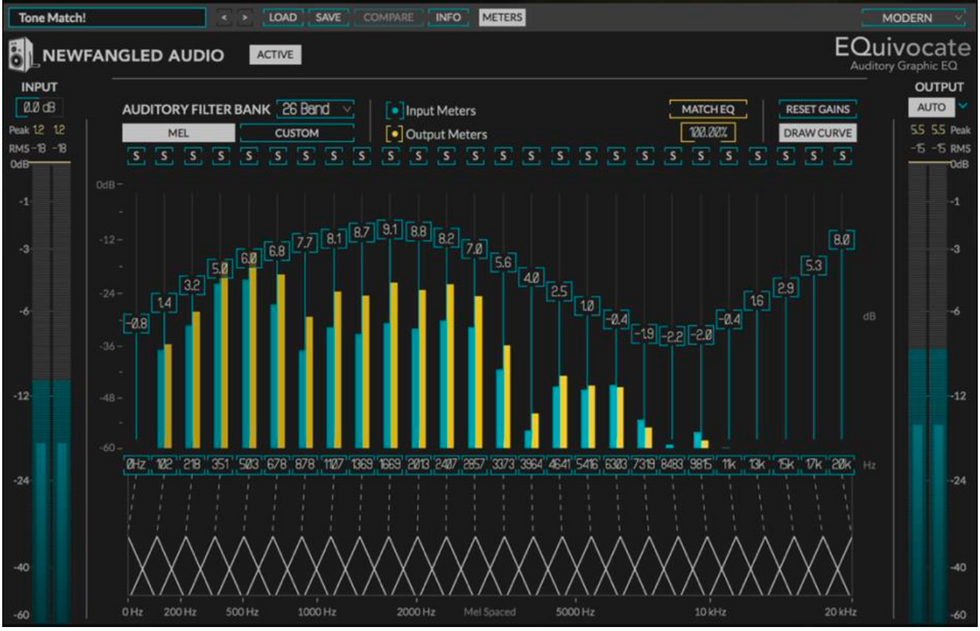
• Newfangled Audio EQuivocate Multi-Band EQ ($99 street): As engineers, we know that there are different benefits and practical applications of the two main types of equalizers: parametric and graphic. The EQuivocate plugin is a straightforward, easy-to-use graphic equalizer that gives you access to 26 filter bands that correspond to the critical bands of the human auditory system. In addition to the standard method of manipulating individual filter bands, EQuivocate has a draw curve parameter that allows you to quickly shape the frequency spectrum across multiple bands. If you’re new to the concept of using graphic equalizers, EQuivocate has a bank of custom presets that can give you a good starting place for mixing and mastering applications.
“Your DAW already has enough built-in effects for you to develop an understanding of what they do and how they work.”

• Waves V-EQ4 ($29 street): Neve introduced the 1081 console channel module in 1972 and deployed it in legendary boards such as the 8048. The VEQ-4 is an emulation of the EQ section of the 1081 that, to our ears, sounds just like a Neve EQ. This is a pretty simple box to use. It gives you the ability to add some high-frequency sheen or low-end thump—and everything in between. This EQ works well on just about any instrument or voice, doing subtle tweaks or broad curves. I like to use it on busses, and sometimes on the master bus, to color the entire mix. It’s a versatile and useful plugin for any style of music.
Filters
These frequency wranglers come in three varieties— low-pass, high-pass, and band-pass—and ride the sonic range hard, establishing cutoff levels. The simple explanation: High-pass filters will disable frequencies below a set cutoff point, low-pass will zap those over the cutoff, and band filters will affect only those in a selected band.
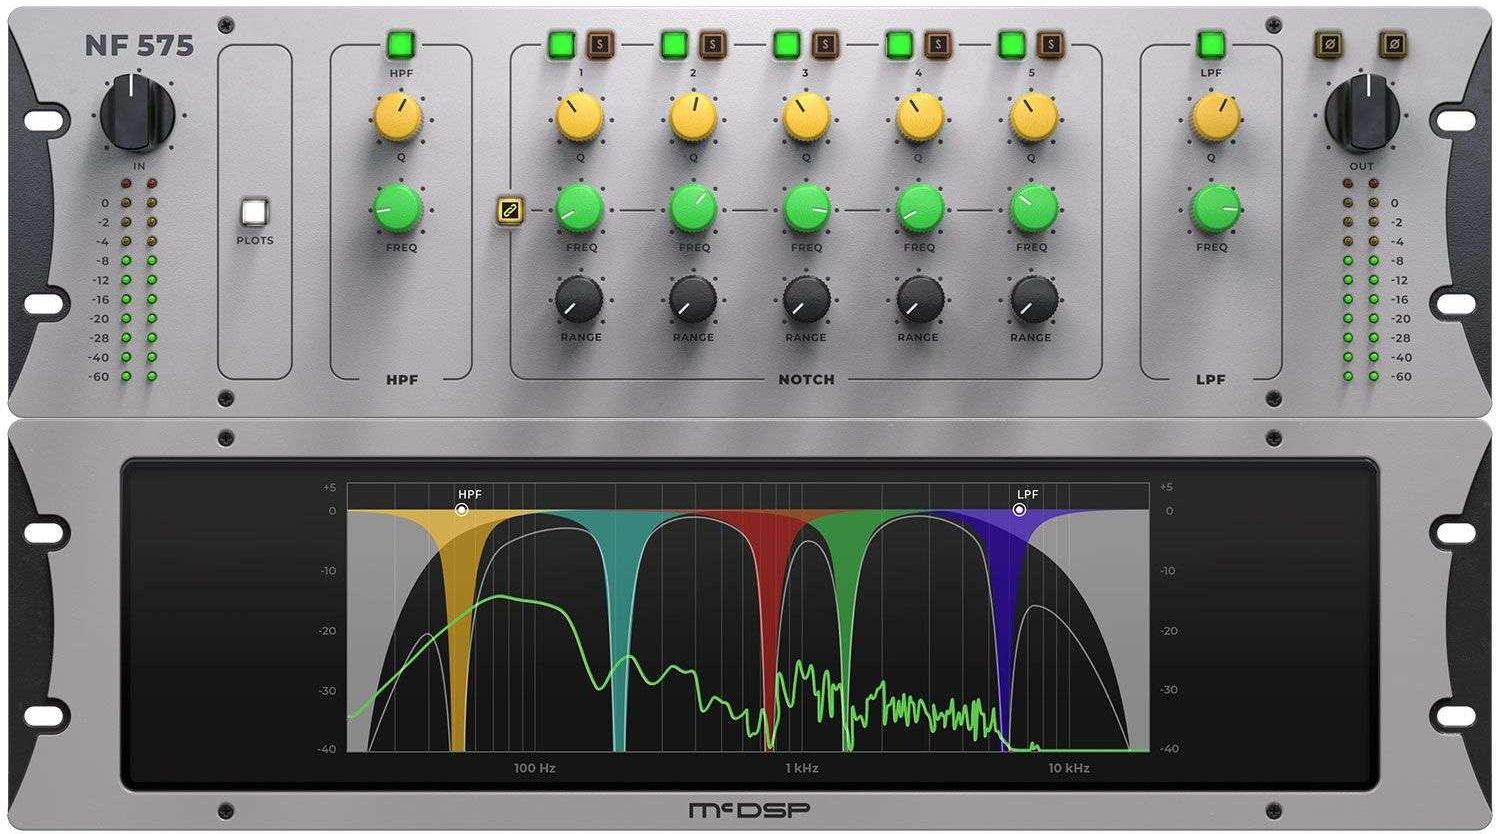
• McDSP NF575 Noise Filter HD Native v7 ($79 street): The McDSP Noise Filter is a very sophisticated device for removing low-frequency rumble and high-frequency hiss from your audio. With hundreds of presets and real-time analyzers, this may be the most effective noise filter we’ve ever used, and we’ve used analog and digital filters for many different kinds of audio clean-up. With seven precise notch filters, it’s easy to dial in the parts of a sound you want removed. You can solo a notch filter and hear exactly what you are removing, too. This is a very handy tool when you need to clean up or fix some audio.
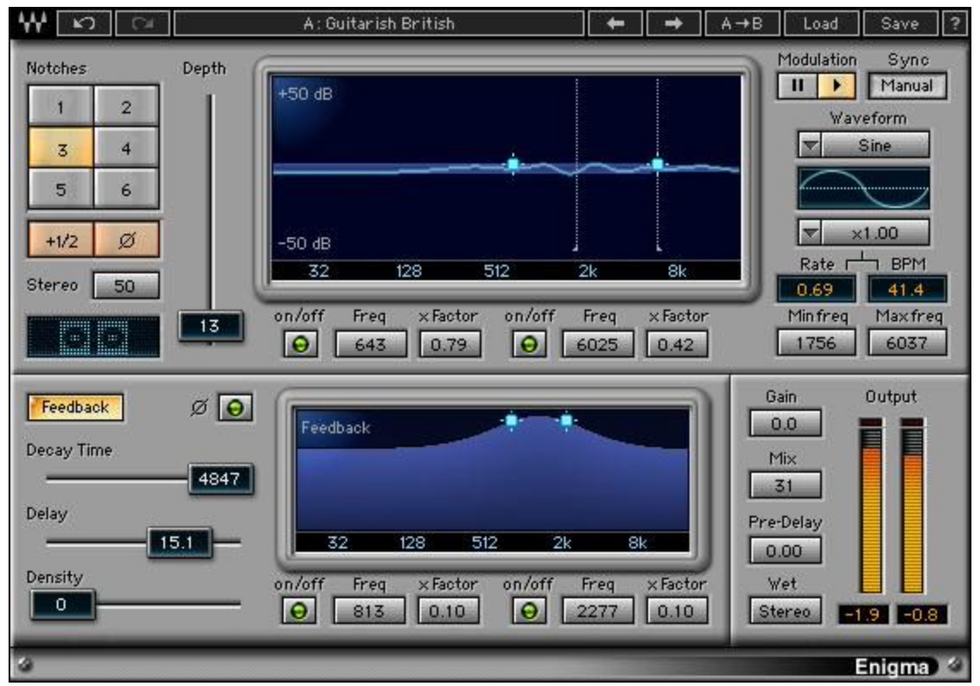
• Waves Enigma ($29 street): While we use Enigma primarily as an EQ sculpting tool, since it is extremely useful when used to filter out particular frequencies, it also offers a unique combination of filters, reverbs, delays, and modulation—allowing you to create some totally original sounds. So, the addition of the other features makes this tool much more than just a filter. Using Enigma effectively may take some time experimenting to discover how to best use the different features, but you will be rewarded with fresh sonic possibilities for fixing problems or creating new sounds.
The Upshot
You can do a lot with a handful of simple plugins, so you don’t have to spend a ton of money on them to make great-sounding recordings. Investigate. Be selective. And your DAW already has enough built-in effects for you to develop an understanding of what they do and how they work. Learning to use plugins mostly requires you to simply use and trust your ears in order to get great sounds.


Fig. 1
Think about this for a moment: The vocoder was developed in 1938 at Bell Labs by Homer Dudley as a way of synthesizing the human voice for conserving bandwidth in telephone communications. That's almost a century ago! Aside from synth pioneer Bob Moog's early versions, the vocoder didn't hit the musical mainstream until 1970 when Moog and Wendy Carlos Williams built a solid-state, 10-band version based on Dudley's designs. Put simply, the carrier signal came from one of Moog's modular synthesizers and the modulator came from the input of a microphone presumably with someone on the other end speaking profound words.
Soon afterwards, the vocoder was featured on early groundbreaking recordings: Isao Tomita's Electric Samurai (1972), the Alan Parsons Project's "The Raven" from Tales of Mystery and Imagination (1976), and ELO "Mr. Blue Sky" from Out of the Blue (1977), to name a few. Since then, it has been used in TV (my favorite was the voice of the Cylons in Battlestar Galactica), and on more records by diverse artists including Stevie Wonder, Red Hot Chili Peppers, Michael Jackson, Daft Punk, and Coldplay.
It's a way to add another voice to the solo that might be so left-of-center that it's exactly the kind of crazy texture that you've been searching for.
Most of the time, a vocoder is used to synthesize vocal parts and create everything from monophonic (single voice) to polyphonic (many voices) textures. A typical way to do this would be to speak (or sing) into a microphone and hold some keys down on a vocoder and, voilà, you have a chord of your words.
Now, here is where things get a bit more interesting. Obviously, the guitar is a chordal instrument. However, when we play a melody, or shred some single-note solos, we can essentially think of it as a "voice," but without formants: consonants, vowels, diphthongs, and other articulations that basically shape the way we speak and help create everything from languages to dialects.
For our purposes, we're going to use a pre-recorded guitar melody (or solo) and route the output of that track into a vocoder and then use a MIDI keyboard to add a note-for-note harmonized piano recreation. It's a way to add another voice to the solo that might be so left-of-center that it's exactly the kind of crazy texture that you've been searching for.
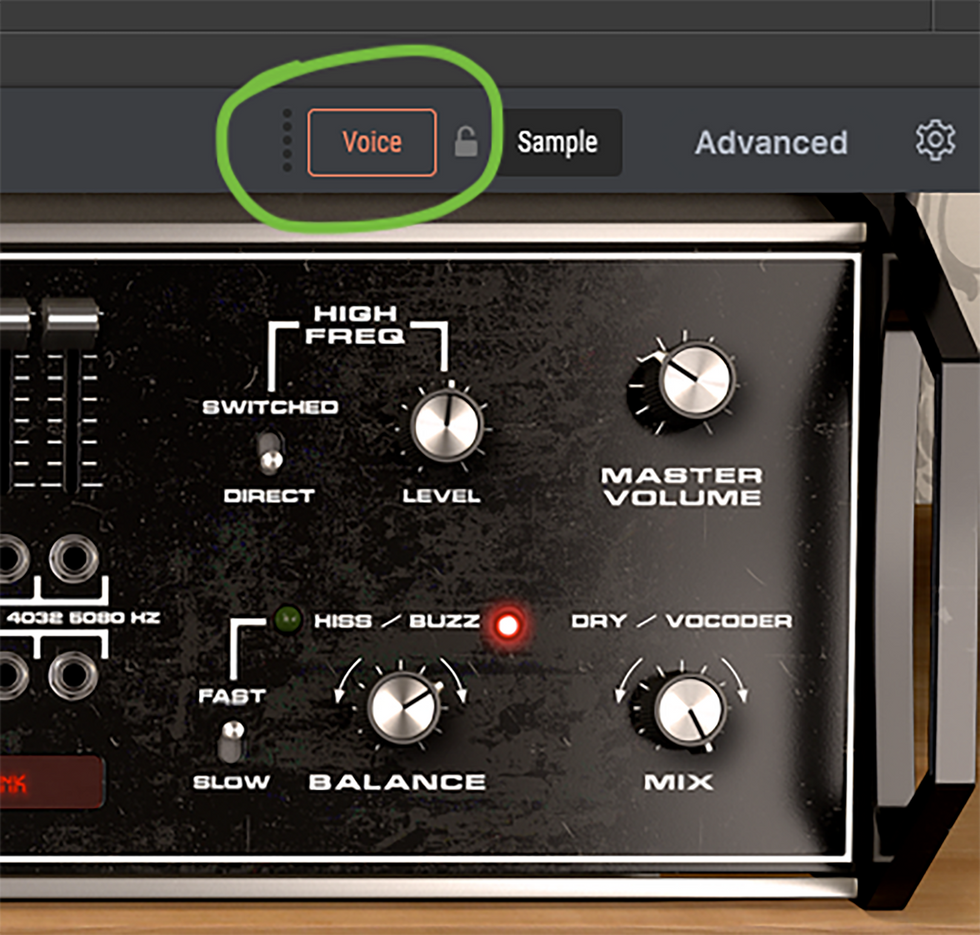
Fig. 2
I did this most recently on a record I produced where, during my pedal-steel solo, I wanted to double my single notes using a vocoder plug-in (Arturia's Vocoder V, $199 street). This vocoder combines both carrier and modulator, and greatly expands what a traditional vocoder can do. For example, you can load in your own samples, or take the output of one of your tracks in your session and use it as a keyed input to add some vocoder magic. That's what I'm going to show you how to do.
The astute might ask this question: "Why don't you just use any synth (analog or plug-in) and play along with your guitar parts?" Two good reasons. One, using this technique, the rhythm will be exact, so every start and stop of the track will be preserved no matter what key(s) you're playing on the keyboard. Two, it will sound like a vocoder trying to double your part and not another synth. Vocoders have a specific sound especially perfect for multi-part designs.
Try this: Find a guitar track in your session that has some tasty single-note licks. Next, route the output of the track to an aux bus. Name the bus GTR Vocoder (or something you'll remember). Create a new stereo instrument track and instantiate the vocoder you want to use. For this example, I'm using the Vocoder V by Arturia. On the vocoder, change the key input to GTR Vocoder (or whatever you named your aux bus [Fig. 1] and make sure the input is set to Voice [Fig.2]. Now, you've essentially tricked your vocoder into thinking that there is a microphone input, but it's really your guitar track! Have fun and be sure to play with the parameters of the vocoder to really mangle your sound and get into uncharted territories. As usual, I recommend coming by my website to see and hear this technique in action. Namaste.
Photo 1
Most often, when recording acoustic guitar and a vocal together, the challenge for an engineer is to get as much separation of each sound source as possible. That way, if it's a stellar vocal performance but the guitar had some wrong notes or missed chords, the whole take doesn't need to be immediately scrapped. Yes, it is true that some audio artifacts may be present. We are dealing with the laws of physics, sound waves, and using two mics. But you may be able to reduce the offending track's flubs with such aplomb that the world may never know. That all depends on … angles.
You may recall that back in January I devoted an entire Dojo to microphone polar patterns, and that knowledge will come in very handy this month. In particular, your knowledge of cardioid, hypercardioid, and figure-eight polar patterns.
Let's begin with cardioid mics. The vast majority of microphones on the market are cardioid, and they come in every variety within the three main mic categories: dynamic, condenser, and ribbon. Generally, small diaphragm condenser mics offer enhanced clarity and articulation of transients on acoustic sources. Regardless of what you may have, the placement of the mics becomes the most important thing.
"You may be able to reduce the offending track's flubs with such aplomb that the world may never know."
One of my favorite workhorse mics for recording vocals in this situation is the fixed-cardioid Shure SM7B ($399 street). I like to pair this with a small-diaphragm cardioid condenser mic, like a vintage Neumann KM84, KM54, or more recent affordable mics like the superb Rode TF-5 ($1,499, matched pair), or even the budget friendly Rode NT5 ($429 matched pair). Regardless of your budget, what you want are two microphones that are either fixed cardioid or have variable polar patterns that can give you cardioid and hypercardioid pattern choices. One of my favorite mics to use on acoustic guitar is the Beyerdynamic M 160 ($699 street). It's a ribbon mic (my favorite type of mic) and it's hypercardioid, which means it offers excellent off-axis rejection.
How to place the instrument mic.
Have a look at photo 1. Notice that I've placed this cardioid mic, a Rode TF-5, close to the guitar. The capsule of the mic is aimed at the guitar's 14th fret, and it is also angled to almost 45 degrees relative to the floor. This placement will give you increased rejection of the vocals as long as this mic is around stomach-to-chest height and below the singer's mouth. Experiment with height placement and see what gives you the best results. I also like to place this mic directly under the vocal mic so I can use the upper mic as a makeshift baffle. This works best if the upper mic (the vocal mic) has a larger body than the lower instrument mic.

Photo 2
How to place the vocal mic.
Photo 2 shows how I've angled the vocal mic (a Mojave Audio MA-200, $1,199 street) upward towards the mouth from about chest/throat level. You can tinker with this height depending upon how the singer sits and plays. Most singers who are also playing will be looking down toward the neck of the guitar as they play, but if there is quite a bit of slouching, move the mic lower and increase the upward angle of the capsule. If the mic you are using can vary its polar pattern to hypercardioid, use that and listen to the differences. Ideally, at least one your mics would be variable enough to be hypercardioid, if not both. Also, place the mic that has the tightest polar pattern (hypercardioid in this case) on the guitar, since it will move the least relative to the voice.
Keep experimenting, and until next month, namaste.
DIY: How to Mic Your Acoustic Like a Pro
Photo 1: Waves Audio IR-1
Most of us add reverb at some point in our recording process, and most of that is through digital plug-ins found in our DAW or by third-party makers (FabFilter, Waves, Universal Audio, etc.) or through rackmounted outboard gear. (Photos 1 and 2 provide a look at the Waves Audio's IR-1 and FabFilter's Pro R in action.) Whatever type of reverb you add, I'd be willing to bet that your process might be similar to this: pull up a reverb, set the amount of wet/dry, maybe tweak the overall time, and you're done. But there's so much more you can do!
I'd be willing to bet that your process might be similar to this: pull up a reverb, set the amount of wet/dry, maybe tweak the overall time, and you're done. But there's so much more you can do!
First, let's look at the main parameters of reverb. In any given space (size doesn't matter), something has to happen that sets sound pressure waves in motion. This is called an impulse function (a loud clap, popping a balloon, a righteous, single, 100-watt djent, etc.). The measurement of that impulse function is called the impulse response (IR). The impulse response contains four main parameters of what we generally call reverb.
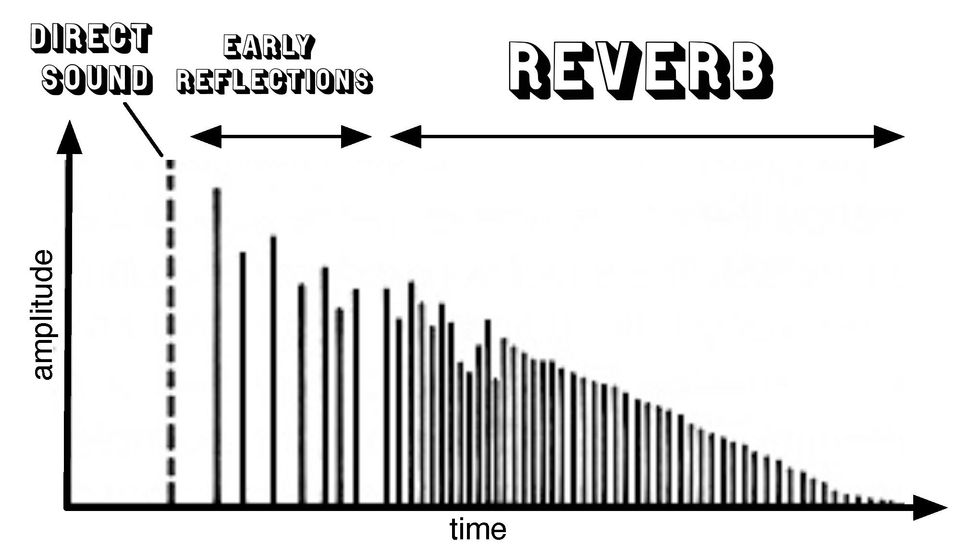
Fig. 1
Imagine Metallica is doing a soundcheck at your local stadium and they're going to perform "Damage, Inc." (Still one of my favorite songs!) You're in front-of-house position (FOH), where the mix engineer sits. After the layered reversed guitar intro (lasting 1:18, for those listening at home), the band kicks in with those devastating, staccato, "chunks." With each one, several things happen in rapid succession—remember, I'm relating this as simply as possible as it's really complex. Look at Fig.1. You'll see the:
- Direct sound: A certain amount of sound reaches your ears directly, without reflecting off anything. Obviously, you hear this first.
- Early reflections: These initial reflections are easy to hear and generally bounce off a few things before reaching your ears and arrive closely after the direct sound.
- Reverb: As more reflected sounds reach your ears with mosh-pit ferocity, the ears can no longer make out individual early reflections because of the buildup, and "reverb" starts.Length: Once reverb starts, the time it takes for the sound to bounce off the rafters and for the venue to eventually fall silent again is known as the reverb time or RT60. RT60 is generally the amount of time it takes for the IR to fade 60 dB and merge back with the inherent noise floor of the building.
- Length: Once reverb starts, the time it takes for the sound to bounce off the rafters and for the venue to eventually fall silent again is known as the reverb time or RT60. RT60 is generally the amount of time it takes for the IR to fade 60 dB and merge back with the inherent noise floor of the building.
Okay, now let's get down to business. Most reverb plug-ins allow you to adjust time, EQ, pre-delay, and mix (wet/dry). Some, like Waves IR-1 reverb ($29 street) and FabFilter's Pro R ($199 street) offer much more, but in very different ways.
Adjusting the Pre-Delay
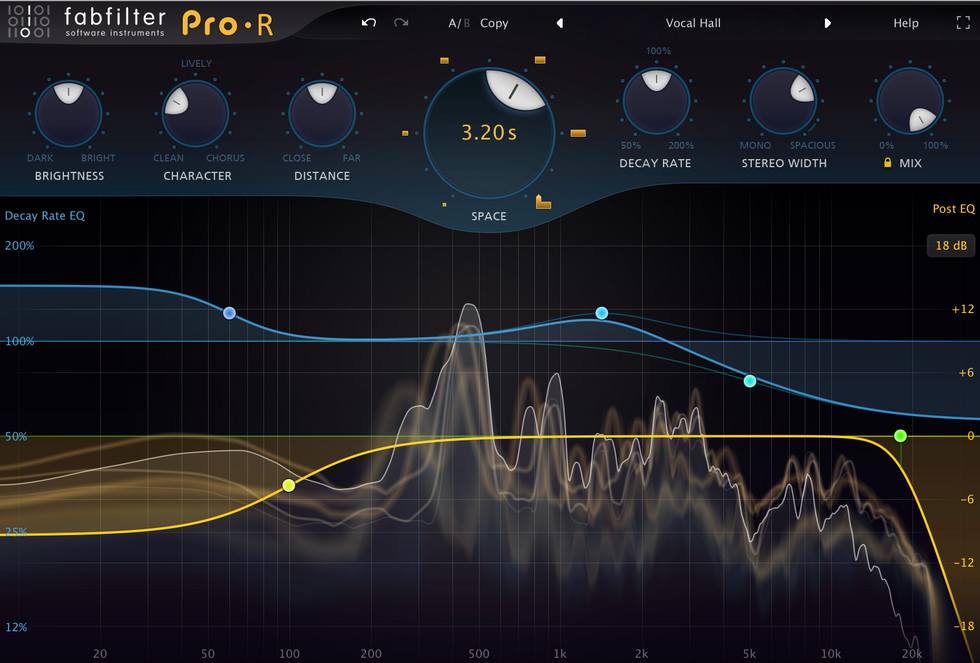
Photo 2 : FabFilter's Pro R
Increasing the pre-delay will postpone the arrival time of reverb. Which means that you can easily defy the laws of physics. Since sound travels at 1,125 feet per second (at 68 degrees Fahrenheit at sea level), by adjusting the pre-delay, you can move the arrival time of the reverb to a later point (that's not physically possible), yet when the reverb actually starts, it goes back to obeying the laws of physics. This trick is often used to bring clarity to an instrument's articulation and to subtle parameters that might be getting washed out in the original reverb. This works extremely well on vocals, snare drum, acoustic guitars, staccato power chords, etc. Further, some pre-delay settings can be synced (quarter-, eighth-, 16th-note, etc.) to the BPM of the song. FabFilter's Pro R does this, again violating the laws of physics. Adding even more violations to the properties of sound, Waves IR will allow you to add a pre-delay to the early reflections before reverb.
Adjusting the EQ
Adjusting the reverb's EQ can add another layer of complexity. Boosting top end to make it brighter can make a heavily pre-delayed reverb sound like it would if it were closer to the source, but, because of the pre-delay, it would organically sound dark and dull. One other thing to try is adding a narrow Q to a frequency band (or several) and tuning your reverb to the key or a specific harmony you wish.
I encourage you to play with all the available parameters as much as you can and see what kind of craziness you can come up with. I'll be sharing some of mine on my website, bryanclarkmusic.com, should you want to see and hear some more examples. Until next time, stay open-minded and keep rocking! Namaste.